40 KiB
ASP.NET Core {{UI_Value}} Tutorial - Part 2
//[doc-params]
{
    "UI": ["MVC","NG"]
}
{{ if UI == "MVC" DB="ef" DB_Text="Entity Framework Core" UI_Text="mvc" else if UI == "NG" DB="mongodb" DB_Text="MongoDB" UI_Text="angular" else DB ="?" UI_Text="?" end }}
About this tutorial
This is the second part of the ASP.NET Core {{UI_Value}} tutorial series. All parts:
- Part I: Creating the project and book list page
- Part II: Creating, updating and deleting books (this tutorial)
- Part III: Integration tests
You can also watch this video course prepared by an ABP community member, based on this tutorial.
{{if UI == "MVC"}}
Creating a new book
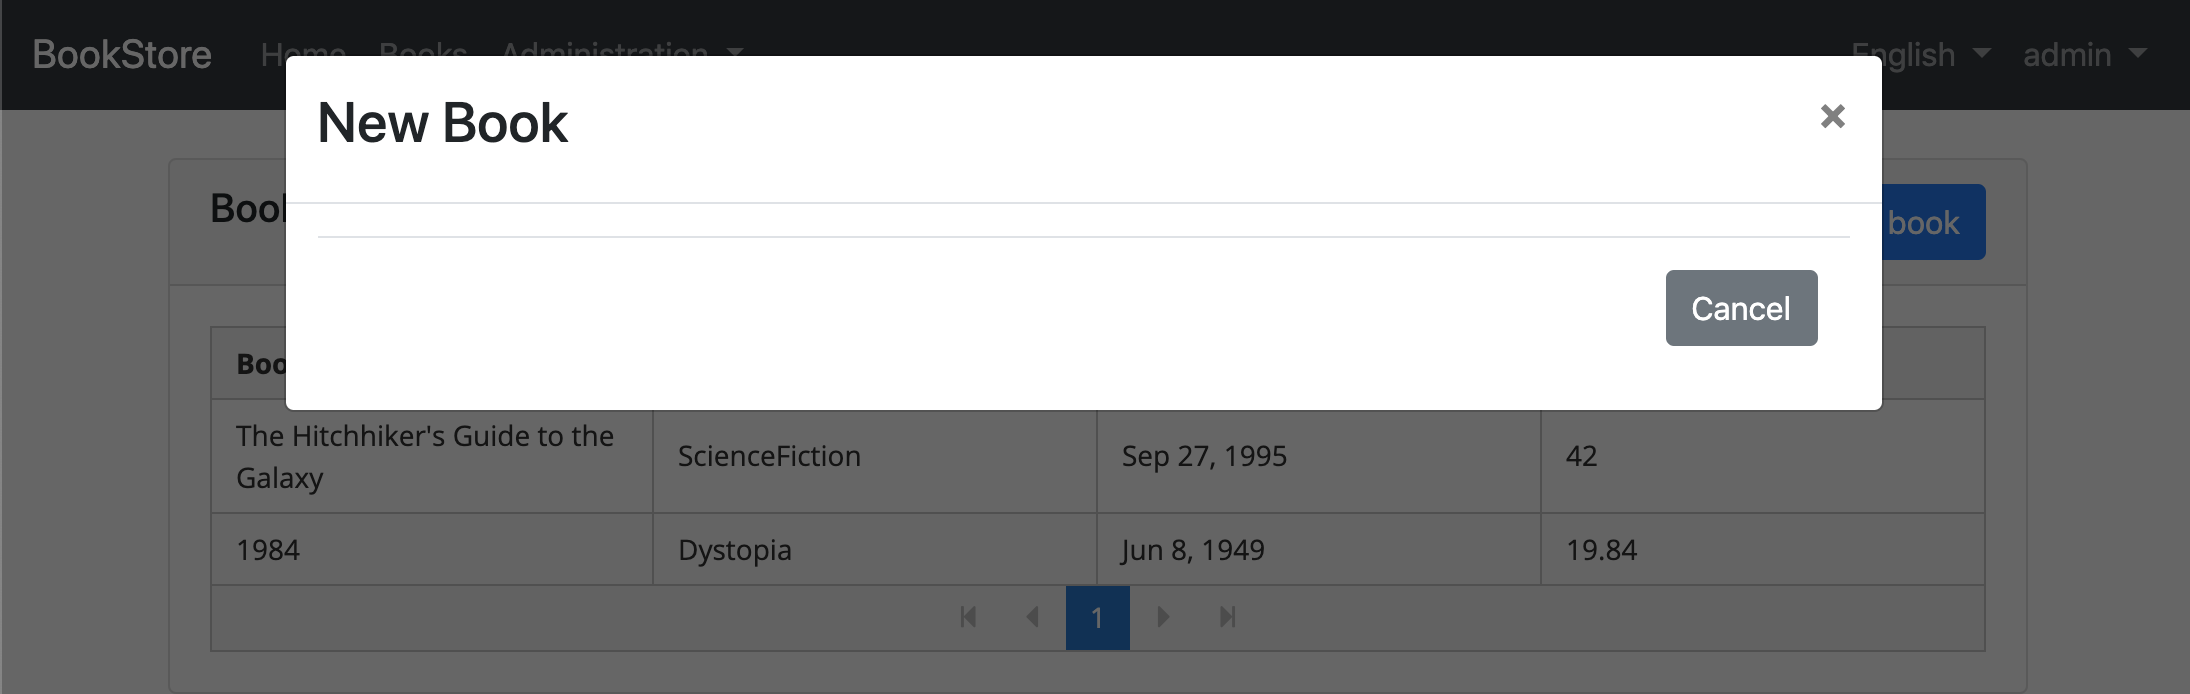
In this section, you will learn how to create a new modal dialog form to create a new book. The modal dialog will look like in the below image:

Create the modal form
Create a new razor page, named CreateModal.cshtml under the Pages/Books folder of the Acme.BookStore.Web project.
CreateModal.cshtml.cs
Open the CreateModal.cshtml.cs file (CreateModalModel class) and replace with the following code:
using System.Threading.Tasks;
using Microsoft.AspNetCore.Mvc;

namespace Acme.BookStore.Web.Pages.Books
{
    public class CreateModalModel : BookStorePageModel
    {
        [BindProperty]
        public CreateUpdateBookDto Book { get; set; }

        private readonly IBookAppService _bookAppService;

        public CreateModalModel(IBookAppService bookAppService)
        {
            _bookAppService = bookAppService;
        }

        public async Task<IActionResult> OnPostAsync()
        {
            await _bookAppService.CreateAsync(Book);
            return NoContent();
        }
    }
}
- This class is derived from the
BookStorePageModelinstead of standardPageModel.BookStorePageModelinherits thePageModeland adds some common properties & methods that can be used in your page model classes. [BindProperty]attribute on theBookproperty binds post request data to this property.- This class simply injects the
IBookAppServicein the constructor and calls theCreateAsyncmethod in theOnPostAsynchandler.
CreateModal.cshtml
Open the CreateModal.cshtml file and paste the code below:
@page
@using Volo.Abp.AspNetCore.Mvc.UI.Bootstrap.TagHelpers.Modal
@model Acme.BookStore.Web.Pages.Books.CreateModalModel
@{
    Layout = null;
}
<abp-dynamic-form abp-model="Book" data-ajaxForm="true" asp-page="/Books/CreateModal">
    <abp-modal>
        <abp-modal-header title="@L["NewBook"].Value"></abp-modal-header>
        <abp-modal-body>
            <abp-form-content />
        </abp-modal-body>
        <abp-modal-footer buttons="@(AbpModalButtons.Cancel|AbpModalButtons.Save)"></abp-modal-footer>
    </abp-modal>
</abp-dynamic-form>
- This modal uses
abp-dynamic-formtag helper to automatically create the form from the modelCreateBookViewModel.abp-modelattribute indicates the model object where it's theBookproperty in this case.data-ajaxFormattribute sets the form to submit via AJAX, instead of a classic page post.abp-form-contenttag helper is a placeholder to render the form controls (it is optional and needed only if you have added some other content in theabp-dynamic-formtag, just like in this page).
Add the "New book" button
Open the Pages/Books/Index.cshtml and set the content of abp-card-header tag as below:
<abp-card-header>
    <abp-row>
        <abp-column size-md="_6">
            <h2>@L["Books"]</h2>
        </abp-column>
        <abp-column size-md="_6" class="text-right">
            <abp-button id="NewBookButton"
                        text="@L["NewBook"].Value"
                        icon="plus"
                        button-type="Primary" />
        </abp-column>
    </abp-row>
</abp-card-header>
This adds a new button called New book to the top-right of the table:
Open the pages/books/index.js and add the following code just after the Datatable configuration:
var createModal = new abp.ModalManager(abp.appPath + 'Books/CreateModal');

createModal.onResult(function () {
    dataTable.ajax.reload();
});

$('#NewBookButton').click(function (e) {
    e.preventDefault();
    createModal.open();
});
abp.ModalManageris a helper class to manage modals in the client side. It internally uses Twitter Bootstrap's standard modal, but abstracts many details by providing a simple API.
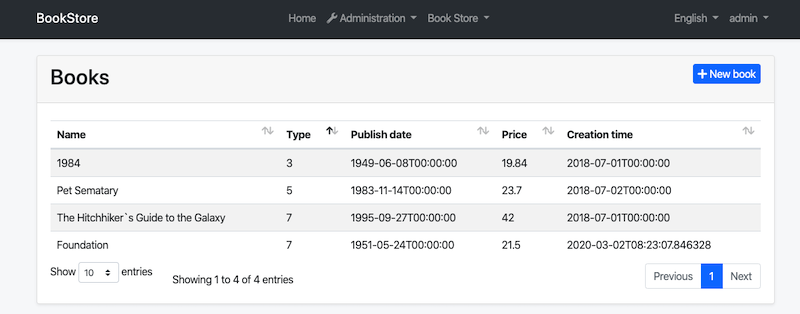
Now, you can run the application and add new books using the new modal form.
Updating a book
Create a new razor page, named EditModal.cshtml under the Pages/Books folder of the Acme.BookStore.Web project:

EditModal.cshtml.cs
Open the EditModal.cshtml.cs file (EditModalModel class) and replace with the following code:
using System;
using System.Threading.Tasks;
using Microsoft.AspNetCore.Mvc;

namespace Acme.BookStore.Web.Pages.Books
{
    public class EditModalModel : BookStorePageModel
    {
        [HiddenInput]
        [BindProperty(SupportsGet = true)]
        public Guid Id { get; set; }

        [BindProperty]
        public CreateUpdateBookDto Book { get; set; }

        private readonly IBookAppService _bookAppService;

        public EditModalModel(IBookAppService bookAppService)
        {
            _bookAppService = bookAppService;
        }

        public async Task OnGetAsync()
        {
            var bookDto = await _bookAppService.GetAsync(Id);
            Book = ObjectMapper.Map<BookDto, CreateUpdateBookDto>(bookDto);
        }

        public async Task<IActionResult> OnPostAsync()
        {
            await _bookAppService.UpdateAsync(Id, Book);
            return NoContent();
        }
    }
}
[HiddenInput]and[BindProperty]are standard ASP.NET Core MVC attributes.SupportsGetis used to be able to getIdvalue from query string parameter of the request.- In the
GetAsyncmethod, we getBookDtofromBookAppServiceand this is being mapped to the DTO objectCreateUpdateBookDto. - The
OnPostAsyncusesBookAppService.UpdateAsync()to update the entity.
Mapping from BookDto to CreateUpdateBookDto
To be able to map the BookDto to CreateUpdateBookDto, configure a new mapping. To do this, open the BookStoreWebAutoMapperProfile.cs in the Acme.BookStore.Web project and change it as shown below:
using AutoMapper;

namespace Acme.BookStore.Web
{
    public class BookStoreWebAutoMapperProfile : Profile
    {
        public BookStoreWebAutoMapperProfile()
        {
            CreateMap<BookDto, CreateUpdateBookDto>();
        }
    }
}
- We have just added
CreateMap<BookDto, CreateUpdateBookDto>();to define this mapping.
EditModal.cshtml
Replace EditModal.cshtml content with the following content:
@page
@using Acme.BookStore.Web.Pages.Books
@using Volo.Abp.AspNetCore.Mvc.UI.Bootstrap.TagHelpers.Modal
@model EditModalModel
@{
    Layout = null;
}
<abp-dynamic-form abp-model="Book" data-ajaxForm="true" asp-page="/Books/EditModal">
    <abp-modal>
        <abp-modal-header title="@L["Update"].Value"></abp-modal-header>
        <abp-modal-body>
            <abp-input asp-for="Id" />
            <abp-form-content />
        </abp-modal-body>
        <abp-modal-footer buttons="@(AbpModalButtons.Cancel|AbpModalButtons.Save)"></abp-modal-footer>
    </abp-modal>
</abp-dynamic-form>
This page is very similar to the CreateModal.cshtml, except:
- It includes an
abp-inputfor theIdproperty to storeIdof the editing book (which is a hidden input). - It uses
Books/EditModalas the post URL and Update text as the modal header.
Add "Actions" dropdown to the table
We will add a dropdown button to the table named Actions.
Open the Pages/Books/Index.cshtml page and change the <abp-table> section as shown below:
<abp-table striped-rows="true" id="BooksTable">
    <thead>
        <tr>
            <th>@L["Actions"]</th>
            <th>@L["Name"]</th>
            <th>@L["Type"]</th>
            <th>@L["PublishDate"]</th>
            <th>@L["Price"]</th>
            <th>@L["CreationTime"]</th>
        </tr>
    </thead>
</abp-table>
- We just added a new
thtag for the "Actions" button.
Open the pages/books/index.js and replace the content as below:
$(function () {

    var l = abp.localization.getResource('BookStore');

    var createModal = new abp.ModalManager(abp.appPath + 'Books/CreateModal');
    var editModal = new abp.ModalManager(abp.appPath + 'Books/EditModal');

    var dataTable = $('#BooksTable').DataTable(abp.libs.datatables.normalizeConfiguration({
        processing: true,
        serverSide: true,
        paging: true,
        searching: false,
        autoWidth: false,
        scrollCollapse: true,
        order: [[1, "asc"]],
        ajax: abp.libs.datatables.createAjax(acme.bookStore.book.getList),
        columnDefs: [
            {
                rowAction: {
                    items:
                        [
                            {
                                text: l('Edit'),
                                action: function (data) {
                                    editModal.open({ id: data.record.id });
                                }
                            }
                        ]
                }
            },
            { data: "name" },
            { data: "type" },
            { data: "publishDate" },
            { data: "price" },
            { data: "creationTime" }
        ]
    }));

    createModal.onResult(function () {
        dataTable.ajax.reload();
    });

    editModal.onResult(function () {
        dataTable.ajax.reload();
    });

    $('#NewBookButton').click(function (e) {
        e.preventDefault();
        createModal.open();
    });
});
- Used
abp.localization.getResource('BookStore')to be able to use the same localization texts defined on the server-side. - Added a new
ModalManagernamedcreateModalto open the create modal dialog. - Added a new
ModalManagernamededitModalto open the edit modal dialog. - Added a new column at the beginning of the
columnDefssection. This column is used for the "Actions" dropdown button. - "New Book" action simply calls
createModal.open()to open the create dialog. - "Edit" action simply calls
editModal.open()to open the edit dialog.
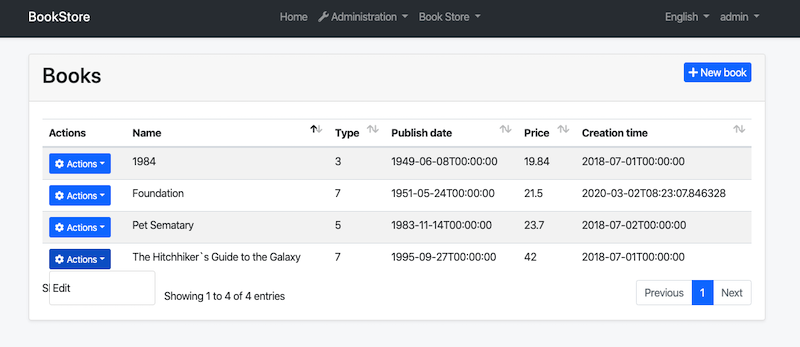
You can run the application and edit any book by selecting the edit action. The final UI looks as below:
Deleting a book
Open the pages/books/index.js and add a new item to the rowAction items:
{
    text: l('Delete'),
    confirmMessage: function (data) {
        return l('BookDeletionConfirmationMessage', data.record.name);
    },
    action: function (data) {
        acme.bookStore.book
            .delete(data.record.id)
            .then(function() {
                abp.notify.info(l('SuccessfullyDeleted'));
                dataTable.ajax.reload();
            });
    }
}
confirmMessageoption is used to ask a confirmation question before executing theaction.acme.bookStore.book.delete()method makes an AJAX request to JavaScript proxy function to delete a book.abp.notify.info()shows a notification after the delete operation.
The final index.js content is shown below:
$(function () {

    var l = abp.localization.getResource('BookStore');

    var createModal = new abp.ModalManager(abp.appPath + 'Books/CreateModal');
    var editModal = new abp.ModalManager(abp.appPath + 'Books/EditModal');

    var dataTable = $('#BooksTable').DataTable(abp.libs.datatables.normalizeConfiguration({
        processing: true,
        serverSide: true,
        paging: true,
        searching: false,
        autoWidth: false,
        scrollCollapse: true,
        order: [[1, "asc"]],
        ajax: abp.libs.datatables.createAjax(acme.bookStore.book.getList),
        columnDefs: [
            {
                rowAction: {
                    items:
                    [
                        {
                            text: l('Edit'),
                            action: function (data) {
                                editModal.open({ id: data.record.id });
                            }
                        },
                        {
                            text: l('Delete'),
                            confirmMessage: function (data) {
                                return l('BookDeletionConfirmationMessage', data.record.name);
                            },
                            action: function (data) {
                                acme.bookStore.book
                                    .delete(data.record.id)
                                    .then(function() {
                                        abp.notify.info(l('SuccessfullyDeleted'));
                                        dataTable.ajax.reload();
                                    });
                            }
                        }
                    ]
                }
            },
            { data: "name" },
            { data: "type" },
            { data: "publishDate" },
            { data: "price" },
            { data: "creationTime" }
        ]
    }));

    createModal.onResult(function () {
        dataTable.ajax.reload();
    });

    editModal.onResult(function () {
        dataTable.ajax.reload();
    });

    $('#NewBookButton').click(function (e) {
        e.preventDefault();
        createModal.open();
    });
});
Open the en.json in the Acme.BookStore.Domain.Shared project and add the following translations:
"BookDeletionConfirmationMessage": "Are you sure to delete the book {0}?",
"SuccessfullyDeleted": "Successfully deleted"
Run the application and try to delete a book.
{{end}}
{{if UI == "NG"}}
Creating a new book
In this section, you will learn how to create a new modal dialog form to create a new book.
State definitions
Open book.action.ts in app\book\state folder and replace the content as below:
import { CreateUpdateBookDto } from '../models'; //<== added this line ==>

export class GetBooks {
  static readonly type = '[Book] Get';
}

// added CreateUpdateBook class
export class CreateUpdateBook {
  static readonly type = '[Book] Create Update Book';
  constructor(public payload: CreateUpdateBookDto) { }
}
- We imported the
CreateUpdateBookDtomodel and created theCreateUpdateBookaction.
Open book.state.ts file in app\book\state folder and replace the content as below:
import { PagedResultDto } from '@abp/ng.core';
import { State, Action, StateContext, Selector } from '@ngxs/store';
import { GetBooks, CreateUpdateBook } from './book.actions'; // <== added CreateUpdateBook==>
import { BookService } from '../services';
import { tap } from 'rxjs/operators';
import { Injectable } from '@angular/core';
import { BookDto } from '../models';

export class BookStateModel {
  public book: PagedResultDto<BookDto>;
}

@State<BookStateModel>({
  name: 'BookState',
  defaults: { book: {} } as BookStateModel,
})
@Injectable()
export class BookState {
  @Selector()
  static getBooks(state: BookStateModel) {
    return state.book.items || [];
  }

  constructor(private bookService: BookService) {}

  @Action(GetBooks)
  get(ctx: StateContext<BookStateModel>) {
    return this.bookService.getListByInput().pipe(
      tap((bookResponse) => {
        ctx.patchState({
          book: bookResponse,
        });
      })
    );
  }

  // added CreateUpdateBook action listener
  @Action(CreateUpdateBook)
  save(ctx: StateContext<BookStateModel>, action: CreateUpdateBook) {
    return this.bookService.createByInput(action.payload);
  }
}
- We imported
CreateUpdateBookaction and defined thesavemethod that will listen to aCreateUpdateBookaction to create a book.
When the SaveBook action dispatched, the save method is being executed. It calls createByInput method of the BookService.
Add a modal to BookListComponent
Open book-list.component.html file in books\book-list folder and replace the content as below:
<div class="card">
  <div class="card-header">
    <div class="row">
      <div class="col col-md-6">
        <h5 class="card-title">
          {%{{{ '::Menu:Books' | abpLocalization }}}%}
        </h5>
      </div>
       <!--Added new book button -->
      <div class="text-right col col-md-6">
        <div class="text-lg-right pt-2">
          <button
            id="create"
            class="btn btn-primary"
            type="button"
            (click)="createBook()"
          >
            <i class="fa fa-plus mr-1"></i>
            <span>{%{{{ "::NewBook" | abpLocalization }}}%}</span>
          </button>
        </div>
      </div>
    </div>
  </div>
  <div class="card-body">
    <abp-table
      [value]="books$ | async"
      [abpLoading]="loading"
      [headerTemplate]="tableHeader"
      [bodyTemplate]="tableBody"
      [rows]="10"
      [scrollable]="true"
    >
    </abp-table>
    <ng-template #tableHeader>
      <tr>
        <th>{%{{{ "::Name" | abpLocalization }}}%}</th>
        <th>{%{{{ "::Type" | abpLocalization }}}%}</th>
        <th>{%{{{ "::PublishDate" | abpLocalization }}}%}</th>
        <th>{%{{{ "::Price" | abpLocalization }}}%}</th>
      </tr>
    </ng-template>
    <ng-template #tableBody let-data>
      <tr>
        <td>{%{{{ data.name }}}%}</td>
        <td>{%{{{ booksType[data.type] }}}%}</td>
        <td>{%{{{ data.publishDate | date }}}%}</td>
        <td>{%{{{ data.price }}}%}</td>
      </tr>
    </ng-template>
  </div>
</div>

<!--added modal-->
<abp-modal [(visible)]="isModalOpen">
    <ng-template #abpHeader>
        <h3>{%{{{ '::NewBook' | abpLocalization }}}%}</h3>
    </ng-template>

    <ng-template #abpBody> </ng-template>

    <ng-template #abpFooter>
        <button type="button" class="btn btn-secondary" #abpClose>
             {%{{{ 'AbpAccount::Close' | abpLocalization }}}%}
        </button>
    </ng-template>
</abp-modal>
- We added the
abp-modalwhich renders a modal to allow user to create a new book. abp-modalis a pre-built component to show modals. While you could use another approach to show a modal,abp-modalprovides additional benefits.- We added
New bookbutton to theAbpContentToolbar.
Open book-list.component.ts file in app\book\book-list folder and replace the content as below:
import { Component, OnInit } from '@angular/core';
import { Select, Store } from '@ngxs/store';
import { Observable } from 'rxjs';
import { finalize } from 'rxjs/operators';
import { BookDto, BookType } from '../models';
import { GetBooks } from '../state/book.actions';
import { BookState } from '../state/book.state';

@Component({
  selector: 'app-book-list',
  templateUrl: './book-list.component.html',
  styleUrls: ['./book-list.component.scss'],
})
export class BookListComponent implements OnInit {
  @Select(BookState.getBooks)
  books$: Observable<BookDto[]>;

  booksType = BookType;

  loading = false;

  isModalOpen = false; // <== added this line ==>

  constructor(private store: Store) {}

  ngOnInit() {
    this.get();
  }

  get() {
    this.loading = true;
    this.store
      .dispatch(new GetBooks())
      .pipe(finalize(() => (this.loading = false)))
      .subscribe(() => {});
  }

  // added createBook method
  createBook() {
    this.isModalOpen = true;
  }
}
- We added
isModalOpen = falseandcreateBookmethod.
You can open your browser and click New book button to see the new modal.
Create a reactive form
Reactive forms provide a model-driven approach to handling form inputs whose values change over time.
Open book-list.component.ts file in app\book\book-list folder and replace the content as below:
import { Component, OnInit } from '@angular/core';
import { Select, Store } from '@ngxs/store';
import { Observable } from 'rxjs';
import { finalize } from 'rxjs/operators';
import { BookDto, BookType } from '../models';
import { GetBooks } from '../state/book.actions';
import { BookState } from '../state/book.state';
import { FormGroup, FormBuilder, Validators } from '@angular/forms'; // <== added this line ==>

@Component({
  selector: 'app-book-list',
  templateUrl: './book-list.component.html',
  styleUrls: ['./book-list.component.scss'],
})
export class BookListComponent implements OnInit {
  @Select(BookState.getBooks)
  books$: Observable<BookDto[]>;

  booksType = BookType;

  loading = false;

  isModalOpen = false;

  form: FormGroup; // <== added this line ==>

  constructor(private store: Store, private fb: FormBuilder) {} // <== added FormBuilder ==>

  ngOnInit() {
    this.get();
  }

  get() {
    this.loading = true;
    this.store
      .dispatch(new GetBooks())
      .pipe(finalize(() => (this.loading = false)))
      .subscribe(() => {});
  }

  createBook() {
    this.buildForm(); //<== added this line ==>
    this.isModalOpen = true;
  }

  // added buildForm method
  buildForm() {
    this.form = this.fb.group({
      name: ['', Validators.required],
      type: [null, Validators.required],
      publishDate: [null, Validators.required],
      price: [null, Validators.required],
    });
  }
}
- We imported
FormGroup, FormBuilder and Validators. - We added
form: FormGroupvariable. - We injected
fb: FormBuilderservice to the constructor. The FormBuilder service provides convenient methods for generating controls. It reduces the amount of boilerplate needed to build complex forms. - We added
buildFormmethod to the end of the file and executedbuildForm()in thecreateBookmethod. This method creates a reactive form to be able to create a new book.- The
groupmethod ofFormBuilder,fbcreates aFormGroup. - Added
Validators.requiredstatic method which validates the relevant form element.
- The
Create the DOM elements of the form
Open book-list.component.html in app\books\book-list folder and replace <ng-template #abpBody> </ng-template> with the following code part:
<ng-template #abpBody>
  <form [formGroup]="form">
    <div class="form-group">
      <label for="book-name">Name</label><span> * </span>
      <input type="text" id="book-name" class="form-control" formControlName="name" autofocus />
    </div>

    <div class="form-group">
      <label for="book-price">Price</label><span> * </span>
      <input type="number" id="book-price" class="form-control" formControlName="price" />
    </div>

    <div class="form-group">
      <label for="book-type">Type</label><span> * </span>
      <select class="form-control" id="book-type" formControlName="type">
        <option [ngValue]="null">Select a book type</option>
        <option [ngValue]="booksType[type]" *ngFor="let type of bookTypeArr"> {%{{{ type }}}%}</option>
      </select>
    </div>

    <div class="form-group">
      <label>Publish date</label><span> * </span>
      <input
        #datepicker="ngbDatepicker"
        class="form-control"
        name="datepicker"
        formControlName="publishDate"
        ngbDatepicker
        (click)="datepicker.toggle()"
      />
    </div>
  </form>
</ng-template>
- This template creates a form with
Name,Price,TypeandPublishdate fields. - We've used NgBootstrap datepicker in this component.
Datepicker requirements
Open book.module.ts file in app\book folder and replace the content as below:
import { NgModule } from '@angular/core';
import { CommonModule } from '@angular/common';
import { BookRoutingModule } from './book-routing.module';
import { BookListComponent } from './book-list/book-list.component';
import { SharedModule } from '../shared/shared.module';
import { NgbDatepickerModule } from '@ng-bootstrap/ng-bootstrap'; //<== added this line ==>

@NgModule({
  declarations: [BookListComponent],
  imports: [
    CommonModule,
    BookRoutingModule,
    SharedModule,
    NgbDatepickerModule, //<== added this line ==>
  ],
})
export class BookModule {}
- We imported
NgbDatepickerModuleto be able to use the date picker.
Open book-list.component.ts file in app\book\book-list folder and replace the content as below:
import { Component, OnInit } from '@angular/core';
import { Select, Store } from '@ngxs/store';
import { Observable } from 'rxjs';
import { finalize } from 'rxjs/operators';
import { BookDto, BookType } from '../models';
import { GetBooks } from '../state/book.actions';
import { BookState } from '../state/book.state';
import { FormGroup, FormBuilder, Validators } from '@angular/forms';
import { NgbDateNativeAdapter, NgbDateAdapter } from '@ng-bootstrap/ng-bootstrap'; // <== added this line ==>

@Component({
  selector: 'app-book-list',
  templateUrl: './book-list.component.html',
  styleUrls: ['./book-list.component.scss'],
  providers: [{ provide: NgbDateAdapter, useClass: NgbDateNativeAdapter }], // <== added this line ==>
})
export class BookListComponent implements OnInit {
  @Select(BookState.getBooks)
  books$: Observable<BookDto[]>;

  booksType = BookType;

  //added bookTypeArr array
  bookTypeArr = Object.keys(BookType).filter(
    (bookType) => typeof this.booksType[bookType] === 'number'
  );

  loading = false;

  isModalOpen = false;

  form: FormGroup;

  constructor(private store: Store, private fb: FormBuilder) {}

  ngOnInit() {
    this.get();
  }

  get() {
    this.loading = true;
    this.store
      .dispatch(new GetBooks())
      .pipe(finalize(() => (this.loading = false)))
      .subscribe(() => {});
  }

  createBook() {
    this.buildForm();
    this.isModalOpen = true;
  }

  buildForm() {
    this.form = this.fb.group({
      name: ['', Validators.required],
      type: [null, Validators.required],
      publishDate: [null, Validators.required],
      price: [null, Validators.required],
    });
  }
}
-
We imported
NgbDateNativeAdapter, NgbDateAdapter -
We added a new provider
NgbDateAdapterthat converts Datepicker value toDatetype. See the datepicker adapters for more details. -
We added
bookTypeArrarray to be able to use it in the combobox values. ThebookTypeArrcontains the fields of theBookTypeenum. Resulting array is shown below:['Adventure', 'Biography', 'Dystopia', 'Fantastic' ...]This array was used in the previous form template in the
ngForloop.
Now, you can open your browser to see the changes:

Saving the book
Open book-list.component.ts file in app\book\book-list folder and replace the content as below:
import { Component, OnInit } from '@angular/core';
import { Select, Store } from '@ngxs/store';
import { Observable } from 'rxjs';
import { finalize } from 'rxjs/operators';
import { BookDto, BookType } from '../models';
import { GetBooks, CreateUpdateBook } from '../state/book.actions'; // <== added CreateUpdateBook ==>
import { BookState } from '../state/book.state';
import { FormGroup, FormBuilder, Validators } from '@angular/forms';
import { NgbDateNativeAdapter, NgbDateAdapter } from '@ng-bootstrap/ng-bootstrap';

@Component({
  selector: 'app-book-list',
  templateUrl: './book-list.component.html',
  styleUrls: ['./book-list.component.scss'],
  providers: [{ provide: NgbDateAdapter, useClass: NgbDateNativeAdapter }],
})
export class BookListComponent implements OnInit {
  @Select(BookState.getBooks)
  books$: Observable<BookDto[]>;

  booksType = BookType;

  bookTypeArr = Object.keys(BookType).filter(
    (bookType) => typeof this.booksType[bookType] === 'number'
  );

  loading = false;

  isModalOpen = false;

  form: FormGroup;

  constructor(private store: Store, private fb: FormBuilder) {}

  ngOnInit() {
    this.get();
  }

  get() {
    this.loading = true;
    this.store
      .dispatch(new GetBooks())
      .pipe(finalize(() => (this.loading = false)))
      .subscribe(() => {});
  }

  createBook() {
    this.buildForm();
    this.isModalOpen = true;
  }

  buildForm() {
    this.form = this.fb.group({
      name: ['', Validators.required],
      type: [null, Validators.required],
      publishDate: [null, Validators.required],
      price: [null, Validators.required],
    });
  }

  // <== added save ==>
  save() {
    if (this.form.invalid) {
      return;
    }

    this.store.dispatch(new CreateUpdateBook(this.form.value)).subscribe(() => {
      this.isModalOpen = false;
      this.form.reset();
      this.get();
    });
  }
}
- We imported
CreateUpdateBook. - We added
savemethod
Open book-list.component.html in app\book\book-list folder and add the following abp-button to save the new book.
<ng-template #abpFooter>
  <button type="button" class="btn btn-secondary" #abpClose>
      {%{{{ 'AbpAccount::Close' | abpLocalization }}}%}
  </button>

  <!--added save button-->
  <button class="btn btn-primary" (click)="save()" [disabled]="form.invalid">
        <i class="fa fa-check mr-1"></i>
        {%{{{ 'AbpAccount::Save' | abpLocalization }}}%}
  </button>
</ng-template>
Find the <form [formGroup]="form"> tag and replace below content:
<form [formGroup]="form" (ngSubmit)="save()"> <!-- added the ngSubmit -->
- We added the
(ngSubmit)="save()"to<form>element to save a new book by pressing the enter. - We added
abp-buttonto the bottom area of the modal to save a new book.
The final modal UI looks like below:

Updating a book
CreateUpdateBook action
Open the book.actions.ts in app\book\state folder and replace the content as below:
import { CreateUpdateBookDto } from '../models';

export class GetBooks {
  static readonly type = '[Book] Get';
}

export class CreateUpdateBook {
  static readonly type = '[Book] Create Update Book';
  constructor(public payload: CreateUpdateBookDto, public id?: string) {} // <== added id parameter ==>
}
- We added
idparameter to theCreateUpdateBookaction's constructor.
Open the book.state.ts in app\book\state folder and replace the save method as below:
@Action(CreateUpdateBook)
save(ctx: StateContext<BookStateModel>, action: CreateUpdateBook) {
  if (action.id) {
    return this.bookService.updateByIdAndInput(action.payload, action.id);
  } else {
    return this.bookService.createByInput(action.payload);
  }
}
BookListComponent
Open book-list.component.ts in app\book\book-list folder and inject BookService dependency by adding it to the constructor and add a variable named selectedBook.
import { Component, OnInit } from '@angular/core';
import { Select, Store } from '@ngxs/store';
import { Observable } from 'rxjs';
import { finalize } from 'rxjs/operators';
import { BookDto, BookType } from '../models';
import { GetBooks, CreateUpdateBook } from '../state/book.actions';
import { BookState } from '../state/book.state';
import { FormGroup, FormBuilder, Validators } from '@angular/forms';
import { NgbDateNativeAdapter, NgbDateAdapter } from '@ng-bootstrap/ng-bootstrap';
import { BookService } from '../services'; // <== imported BookService ==>

@Component({
  selector: 'app-book-list',
  templateUrl: './book-list.component.html',
  styleUrls: ['./book-list.component.scss'],
  providers: [{ provide: NgbDateAdapter, useClass: NgbDateNativeAdapter }],
})
export class BookListComponent implements OnInit {
  @Select(BookState.getBooks)
  books$: Observable<BookDto[]>;

  booksType = BookType;

  bookTypeArr = Object.keys(BookType).filter(
    (bookType) => typeof this.booksType[bookType] === 'number'
  );

  loading = false;

  isModalOpen = false;

  form: FormGroup;

  selectedBook = {} as BookDto; // <== declared selectedBook ==>

  constructor(private store: Store, private fb: FormBuilder, private bookService: BookService) {} //<== injected BookService ==>

  ngOnInit() {
    this.get();
  }

  get() {
    this.loading = true;
    this.store
      .dispatch(new GetBooks())
      .pipe(finalize(() => (this.loading = false)))
      .subscribe(() => {});
  }

  // <== this method is replaced ==>
  createBook() {
    this.selectedBook = {} as BookDto; // <== added ==>
    this.buildForm();
    this.isModalOpen = true;
  }

  // <== added editBook method ==>
  editBook(id: string) {
    this.bookService.getById(id).subscribe((book) => {
      this.selectedBook = book;
      this.buildForm();
      this.isModalOpen = true;
    });
  }

  // <== this method is replaced ==>
  buildForm() {
    this.form = this.fb.group({
      name: [this.selectedBook.name || '', Validators.required],
      type: [this.selectedBook.type || null, Validators.required],
      publishDate: [
        this.selectedBook.publishDate ? new Date(this.selectedBook.publishDate) : null,
        Validators.required,
      ],
      price: [this.selectedBook.price || null, Validators.required],
    });
  }

  save() {
    if (this.form.invalid) {
      return;
    }

    //<== added this.selectedBook.id ==>
    this.store
      .dispatch(new CreateUpdateBook(this.form.value, this.selectedBook.id))
      .subscribe(() => {
        this.isModalOpen = false;
        this.form.reset();
        this.get();
      });
  }
}
- We imported
BookService. - We declared a variable named
selectedBookasBookDto. - We injected
BookServiceto the constructor.BookServiceis being used to retrieve the book data which is being edited. - We added
editBookmethod. This method fetches the book with the givenIdand sets it toselectedBookobject. - We replaced the
buildFormmethod so that it creates the form with theselectedBookdata. - We replaced the
createBookmethod so it setsselectedBookto an empty object. - We added
selectedBook.idto the constructor of the newCreateUpdateBook.
Add "Actions" dropdown to the table
Open the book-list.component.html in app\book\book-list folder and replace the <div class="card-body"> tag as below:
<div class="card-body">
  <abp-table
    [value]="books$ | async"
    [abpLoading]="loading"
    [headerTemplate]="tableHeader"
    [bodyTemplate]="tableBody"
    [rows]="10"
    [scrollable]="true"
  >
  </abp-table>
  <ng-template #tableHeader>
    <tr>
      <th>{%{{{ "::Actions" | abpLocalization }}}%}</th>
      <th>{%{{{ "::Name" | abpLocalization }}}%}</th>
      <th>{%{{{ "::Type" | abpLocalization }}}%}</th>
      <th>{%{{{ "::PublishDate" | abpLocalization }}}%}</th>
      <th>{%{{{ "::Price" | abpLocalization }}}%}</th>
    </tr>
  </ng-template>
  <ng-template #tableBody let-data>
    <tr>
      <td>
        <div ngbDropdown container="body" class="d-inline-block">
          <button
            class="btn btn-primary btn-sm dropdown-toggle"
            data-toggle="dropdown"
            aria-haspopup="true"
            ngbDropdownToggle
          >
            <i class="fa fa-cog mr-1"></i>{%{{{ "::Actions" | abpLocalization }}}%}
          </button>
          <div ngbDropdownMenu>
            <button ngbDropdownItem (click)="editBook(data.id)">
              {%{{{ "::Edit" | abpLocalization }}}%}
            </button>
          </div>
        </div>
      </td>
      <td>{%{{{ data.name }}}%}</td>
      <td>{%{{{ booksType[data.type] }}}%}</td>
      <td>{%{{{ data.publishDate | date }}}%}</td>
      <td>{%{{{ data.price }}}%}</td>
    </tr>
  </ng-template>
</div>
- We added a
thfor the "Actions" column. - We added
buttonwithngbDropdownToggleto open actions when clicked the button. - We have used to NgbDropdown for the dropdown menu of actions.
The final UI looks like as below:

Open book-list.component.html in app\book\book-list folder and find the <ng-template #abpHeader> tag and replace the content as below.
<ng-template #abpHeader>
    <h3>{%{{{ (selectedBook.id ? 'AbpIdentity::Edit' : '::NewBook' ) | abpLocalization }}}%}</h3>
</ng-template>
- This template will show Edit text for edit record operation, New Book for new record operation in the title.
Deleting a book
DeleteBook action
Open book.actions.ts in app\book\state folder and add an action named DeleteBook.
export class DeleteBook {
  static readonly type = '[Book] Delete';
  constructor(public id: string) {}
}
Open the book.state.ts in app\book\state folder and replace the content as below:
import { PagedResultDto } from '@abp/ng.core';
import { State, Action, StateContext, Selector } from '@ngxs/store';
import { GetBooks, CreateUpdateBook, DeleteBook } from './book.actions'; // <== added DeleteBook==>
import { BookService } from '../services';
import { tap } from 'rxjs/operators';
import { Injectable } from '@angular/core';
import { BookDto } from '../models';

export class BookStateModel {
  public book: PagedResultDto<BookDto>;
}

@State<BookStateModel>({
  name: 'BookState',
  defaults: { book: {} } as BookStateModel,
})
@Injectable()
export class BookState {
  @Selector()
  static getBooks(state: BookStateModel) {
    return state.book.items || [];
  }

  constructor(private bookService: BookService) {}

  @Action(GetBooks)
  get(ctx: StateContext<BookStateModel>) {
    return this.bookService.getListByInput().pipe(
      tap((booksResponse) => {
        ctx.patchState({
          book: booksResponse,
        });
      })
    );
  }

  @Action(CreateUpdateBook)
  save(ctx: StateContext<BookStateModel>, action: CreateUpdateBook) {
    if (action.id) {
      return this.bookService.updateByIdAndInput(action.payload, action.id);
    } else {
      return this.bookService.createByInput(action.payload);
    }
  }

  // <== added DeleteBook action listener ==>
  @Action(DeleteBook)
  delete(ctx: StateContext<BookStateModel>, action: DeleteBook) {
    return this.bookService.deleteById(action.id);
  }
}
-
We imported
DeleteBook. -
We added
DeleteBookaction listener to the end of the file.
Delete confirmation popup
Open book-list.component.ts inapp\book\book-list folder and inject the ConfirmationService.
Replace the constructor as below:
import { ConfirmationService } from '@abp/ng.theme.shared';
//...

constructor(
    private store: Store,
    private fb: FormBuilder,
    private bookService: BookService,
    private confirmation: ConfirmationService // <== added this line ==>
) { }
- We imported
ConfirmationService. - We injected
ConfirmationServiceto the constructor.
See the Confirmation Popup documentation
In the book-list.component.ts add a delete method :
import { GetBooks, CreateUpdateBook, DeleteBook } from '../state/book.actions' ;// <== imported DeleteBook ==>

import { ConfirmationService, Confirmation } from '@abp/ng.theme.shared'; //<== imported Confirmation ==>

//...

delete(id: string) {
    this.confirmation
        .warn('::AreYouSureToDelete', 'AbpAccount::AreYouSure')
        .subscribe(status => {
        if (status === Confirmation.Status.confirm) {
            this.store.dispatch(new DeleteBook(id)).subscribe(() => this.get());
        }
    });
}
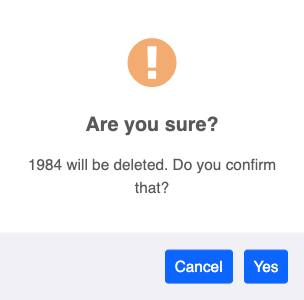
The delete method shows a confirmation popup and subscribes for the user response. DeleteBook action dispatched only if user clicks to the Yes button. The confirmation popup looks like below:
Add a delete button
Open book-list.component.html in app\book\book-list folder and modify the ngbDropdownMenu to add the delete button as shown below:
<div ngbDropdownMenu>
  <!-- added Delete button -->
    <button ngbDropdownItem (click)="delete(data.id)">
        {%{{{ 'AbpAccount::Delete' | abpLocalization }}}%}
    </button>
</div>
The final actions dropdown UI looks like below:

{{end}}
Next Part
See the next part of this tutorial.