3.7 KiB
Getting Started with the React Native
ABP platform provide basic React Native startup template to develop mobile applications integrated to your ABP based backends.
When you create a new application as described in the getting started document, you have to add -m react-native option to include react-native project in your solution.
Configure Your Local IP Address
A React Native application running on an Android emulator or a physical phone can not connect to the backend on localhost. To fix this problem, it is necessary to run the backend application on your local IP address.
{{ if Tiered == "No"}}

- Open the
appsettings.jsonin the.HttpApi.Hostfolder. Replace thelocalhostaddress on theSelfUrlandAuthorityproperties with your local IP address. - Open the
launchSettings.jsonin the.HttpApi.Host/Propertiesfolder. Replace thelocalhostaddress on theapplicationUrlproperties with your local IP address.
{{ else if Tiered == "Yes" }}
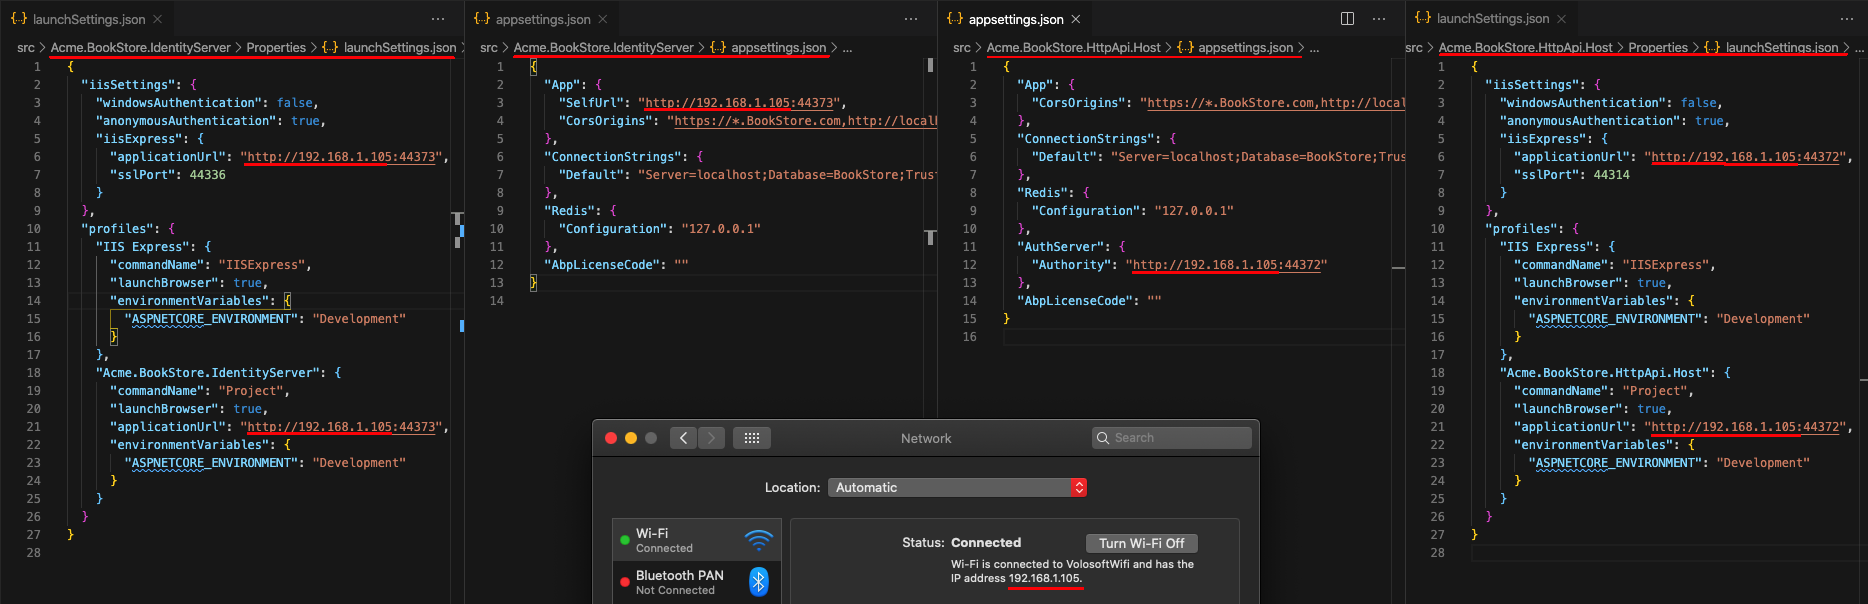
- Open the
appsettings.jsonin the.IdentityServerfolder. Replace thelocalhostaddress on theSelfUrlproperty with your local IP address. - Open the
launchSettings.jsonin the.IdentityServer/Propertiesfolder. Replace thelocalhostaddress on theapplicationUrlproperties with your local IP address. - Open the
appsettings.jsonin the.HttpApi.Hostfolder. Replace thelocalhostaddress on theAuthorityproperty with your local IP address. - Open the
launchSettings.jsonin the.HttpApi.Host/Propertiesfolder. Replace thelocalhostaddress on theapplicationUrlproperties with your local IP address.
{{ end }}
Run the Server Application
Run the backend application as described in the getting started document.
React Native application does not trust the auto-generated .NET HTTPS certificate. You should use HTTP during the development.
Go to the react-native folder, open a command line terminal, type the yarn command (we suggest to the yarn package manager while npm install will also work):
yarn
- Open the
Environment.jsin thereact-nativefolder and replace thelocalhostaddress on theapiUrlandissuerproperties with your local IP address as shown below:

{{ if Tiered == "Yes" }}
Make sure that
issuermatches the running address of the.IdentityServerproject,apiUrlmatches the running address of the.HttpApi.Hostor.Webproject.
{{else}}
Make sure that
issuerandapiUrlmatches the running address of the.HttpApi.Hostor.Webproject.
{{ end }}
Once all node modules are loaded, execute yarn start (or npm start) command:
yarn start
Wait Expo CLI to start. Expo CLI opens the management interface on the http://localhost:19002/ address.

In the above management interface, you can start the application with an Android emulator, an iOS simulator or a physical phone by the scan the QR code with the Expo Client.
See the Android Studio Emulator, iOS Simulator documents on expo.io.

Enter admin as the username and 1q2w3E* as the password to login to the application.
The application is up and running. You can continue to develop your application based on this startup template.