8.7 KiB
Modifying the Menu
The menu is inside the ApplicationLayoutComponent in the @abp/ng.theme.basic package. There are several methods for modifying the menu elements. This document covers these methods. If you would like to replace the menu completely, please refer to Component Replacement documentation and learn how to replace a layout.
How to Add a Logo
The logoUrl property in the environment variables is the url of the logo.
You can add your logo to src/assets folder and set the logoUrl as shown below:
export const environment = {
  // other configurations
  application: {
    name: 'MyProjectName',
    logoUrl: 'assets/logo.png',
  },
  // other configurations
};
How to Add a Navigation Element
Via RoutesService
You can add routes to the menu by calling the add method of RoutesService. It is a singleton service, i.e. provided in root, so you can inject and use it immediately.
import { RoutesService, eLayoutType } from '@abp/ng.core';
import { Component } from '@angular/core';

@Component(/* component metadata */)
export class AppComponent {
  constructor(routes: RoutesService) {
    routes.add([
      {
        path: '/your-path',
        name: 'Your navigation',
        order: 101,
        iconClass: 'fas fa-question-circle',
        requiredPolicy: 'permission key here',
        layout: eLayoutType.application,
      },
      {
        path: '/your-path/child',
        name: 'Your child navigation',
        parentName: 'Your navigation',
        order: 1,
        requiredPolicy: 'permission key here',
      },
    ]);
  }
}
An alternative and probably cleaner way is to use a route provider. First create a provider:
// route.provider.ts
import { RoutesService, eLayoutType } from '@abp/ng.core';
import { APP_INITIALIZER } from '@angular/core';

export const APP_ROUTE_PROVIDER = [
  { provide: APP_INITIALIZER, useFactory: configureRoutes, deps: [RoutesService], multi: true },
];

function configureRoutes(routes: RoutesService) {
  return () => {
    routes.add([
      {
        path: '/your-path',
        name: 'Your navigation',
        requiredPolicy: 'permission key here',
        order: 101,
        iconClass: 'fas fa-question-circle',
        layout: eLayoutType.application,
      },
      {
        path: '/your-path/child',
        name: 'Your child navigation',
        parentName: 'Your navigation',
        requiredPolicy: 'permission key here',
        order: 1,
      },
    ]);
  };
}
...and then in app.module.ts...
import { NgModule } from '@angular/core';
import { APP_ROUTE_PROVIDER } from './route.provider';

@NgModule({
  providers: [APP_ROUTE_PROVIDER],
  // imports, declarations, and bootstrap
})
export class AppModule {}
Here is what every property works as:
pathis the absolute path of the navigation element.nameis the label of the navigation element. A localization key or a localization object can be passed.parentNameis a reference to thenameof the parent route in the menu and is used for creating multi-level menu items.requiredPolicyis the permission key to access the page. See the Permission Management documentorderis the order of the navigation element. "Administration" has an order of100, so keep that in mind when ordering top level menu items.iconClassis the class of theitag, which is placed to the left of the navigation label.layoutdefines in which layout the route will be loaded. (default:eLayoutType.empty)invisiblemakes the item invisible in the menu. (default:false)
Via routes Property in AppRoutingModule
You can define your routes by adding routes as a child property to data property of a route configuration in the app-routing.module. The @abp/ng.core package organizes your routes and stores them in the RoutesService.
You can add the routes property like below:
{
  path: 'your-path',
  data: {
    routes: {
      name: 'Your navigation',
      order: 101,
      iconClass: 'fas fa-question-circle',
      requiredPolicy: 'permission key here',
      children: [
        {
          path: 'child',
          name: 'Your child navigation',
          order: 1,
          requiredPolicy: 'permission key here',
        },
      ],
    },
  },
}
Alternatively, you can do this:
{
  path: 'your-path',
  data: {
    routes: [
      {
        path: '/your-path',
        name: 'Your navigation',
        order: 101,
        iconClass: 'fas fa-question-circle',
        requiredPolicy: 'permission key here',
      },
      {
        path: '/your-path/child',
        name: 'Your child navigation',
        parentName: 'Your navigation',
        order: 1,
        requiredPolicy: 'permission key here',
      },
    ] as ABP.Route[], // can be imported from @abp/ng.core
  },
}
The advantage of the second method is that you are not bound to the parent/child structure and use any paths you like.
After adding the routes property as described above, the navigation menu looks like this:

How to Patch or Remove a Navigation Element
The patch method of RoutesService finds a route by its name and replaces its configuration with the new configuration passed as the second parameter. Similarly, remove method finds a route and removes it along with its children.
// this.routes is instance of RoutesService
// eThemeSharedRouteNames enum can be imported from @abp/ng.theme.shared

const dashboardRouteConfig: ABP.Route = {
  path: '/dashboard',
  name: '::Menu:Dashboard',
  parentName: '::Menu:Home',
  order: 1,
  layout: eLayoutType.application,
};

const newHomeRouteConfig: Partial<ABP.Route> = {
  iconClass: 'fas fa-home',
  parentName: eThemeSharedRouteNames.Administration,
  order: 0,
};

this.routes.add([dashboardRouteConfig]);
this.routes.patch('::Menu:Home', newHomeRouteConfig);
this.routes.remove(['Your navigation']);
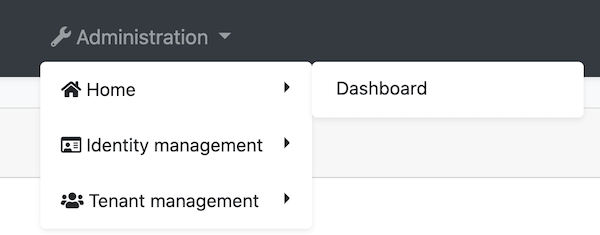
- Moved the Home navigation under the Administration dropdown based on given
parentName. - Added an icon to Home.
- Specified the order and made Home the first item in list.
- Added a route named Dashboard as a child of Home.
- Removed Your navigation along with its child route.
After the operations above, the new menu looks like below:
How to Add an Element to Right Part of the Menu
You can add elements to the right part of the menu by calling the addItems method of NavItemsService. It is a singleton service, i.e. provided in root, so you can inject and use it immediately.
import { NavItemsService } from '@abp/ng.theme.shared';
import { Component } from '@angular/core';

@Component({
  template: `
    <input type="search" placeholder="Search" class="bg-transparent border-0 color-white" />
  `,
})
export class MySearchInputComponent {}


@Component(/* component metadata */)
export class AppComponent {
  constructor(private navItems: NavItemsService) {
    navItems.addItems([
      {
        id: 'MySearchInput',
        order: 1,
        component: MySearchInputComponent,
      },
      {
        id: 'SignOutIcon',
        html: '<i class="fas fa-sign-out-alt fa-lg text-white m-2"><i>',
        action: () => console.log('Clicked the sign out icon'),
        order: 101, // puts as last element
      },
    ]);
  }
}
This inserts a search input and a sign out icon to the menu. The final UI looks like below:

The default elements have an order of
100. If you want to place a custom element before the defaults, assign an order number up to99. If you want to place a custom element after the defaults, assign orders starting from101. Finally, if you must place an item between the defaults, patch the default element orders as described below. A warning though: We may add another default element in the future and it too will have an order number of100.
How to Patch or Remove an Right Part Element
The patchItem method of NavItemsService finds an element by its id property and replaces its configuration with the new configuration passed as the second parameter. Similarly, removeItem method finds an element and removes it.
export class AppComponent {
  constructor(private navItems: NavItemsService) {
    navItems.patchItem(eThemeBasicComponents.Languages, {
      requiredPolicy: 'new policy here',
      order: 1,
    });

    navItems.removeItem(eThemeBasicComponents.CurrentUser);
  }
}
- Patched the languages dropdown element with new
requiredPolicyand neworder. - Removed the current user dropdown element.