# Getting Started
````json
//[doc-params]
{
"UI": ["MVC", "Blazor", "NG"],
"DB": ["EF", "Mongo"],
"Tiered": ["Yes", "No"]
}
````
This tutorial explains how to create a new web application using the [application startup template](Startup-Templates/Application.md).
> This document assumes that you prefer to use **{{ UI_Value }}** as the UI framework and **{{ DB_Value }}** as the database provider. For other options, please change the preference on top of this document.
## Setup Your Development Environment
First things first! Let's setup your development environment before creating the first project.
### Pre-Requirements
The following tools should be installed on your development machine:
* [Visual Studio 2019](https://visualstudio.microsoft.com/vs/) for Windows / [Visual Studio for Mac](https://visualstudio.microsoft.com/vs/mac/). [1](#f-editor)
* [.NET Core 3.1+](https://www.microsoft.com/net/download/dotnet-core/)
* [Node v12 or v14](https://nodejs.org/)
* [Yarn v1.20+ (not v2)](https://classic.yarnpkg.com/en/docs/install) [2](#f-yarn) or npm v6+ (already installed with Node)
{{ if Tiered == "Yes" }}
* [Redis](https://redis.io/) (the startup solution uses the Redis as the [distributed cache](Caching.md)).
{{ end }}
1 _You can use another editor instead of Visual Studio as long as it supports .NET Core and ASP.NET Core._ [↩](#a-editor)
2 _Yarn v2 works differently and is not supported._ [↩](#a-yarn)
### Install the ABP CLI
[ABP CLI](./CLI.md) is a command line interface that is used to automate some common tasks for ABP based solutions.
> ABP CLI is a free & open source tool for the ABP framework.
First, you need to install the ABP CLI using the following command:
````shell
dotnet tool install -g Volo.Abp.Cli
````
If you've already installed, you can update it using the following command:
````shell
dotnet tool update -g Volo.Abp.Cli
````
## Create a New Project
Use the `new` command of the ABP CLI to create a new project:
````shell
abp new Acme.BookStore{{if UI == "NG"}} -u angular{{else if UI == "Blazor"}} -u blazor{{end}}{{if DB == "Mongo"}} -d mongodb{{end}}{{if Tiered == "Yes"}}{{if UI == "MVC"}} --tiered{{else}} --separate-identity-server{{end}}{{end}}
````
> You can use different level of namespaces; e.g. BookStore, Acme.BookStore or Acme.Retail.BookStore.
> Alternatively, you can select the "Direct Download" tab from the [ABP Framework web site](https://abp.io/get-started) to create a new solution.
{{ if Tiered == "Yes" }}
{{ if UI == "MVC" }}
* `--tiered` argument is used to create N-tiered solution where authentication server, UI and API layers are physically separated.
{{ else }}
* `--separate-identity-server` argument is used to separate the identity server application from the API host application. If not specified, you will have a single endpoint on the server.
{{ end }}
{{ end }}
### ABP CLI Commands & Options
[ABP CLI document](./CLI.md) covers all of the available commands and options for the ABP CLI. This document uses the [application startup template](Startup-Templates/Application.md) to create a new web application. See the [ABP Startup Templates](Startup-Templates/Index.md) document for other templates.
### The Solution Structure
The solution has a layered structure (based on the [Domain Driven Design](Domain-Driven-Design.md)) and contains unit & integration test projects. See the [application template document](Startup-Templates/Application.md) to understand the solution structure in details.
{{ if DB == "Mongo" }}
#### MongoDB Transactions
The [startup template](Startup-templates/Index.md) **disables** transactions in the `.MongoDB` project by default. If your MongoDB server supports transactions, you can enable the it in the *YourProjectMongoDbModule* class:
```csharp
Configure(options =>
{
options.TransactionBehavior = UnitOfWorkTransactionBehavior.Auto;
});
```
> Or you can delete this code since this is already the default behavior.
{{ end }}
## Create the Database
### Connection String
Check the **connection string** in the `appsettings.json` file under the {{if Tiered == "Yes"}}`.IdentityServer` and `.HttpApi.Host` projects{{else}}{{if UI=="MVC"}}`.Web` project{{else}}`.HttpApi.Host` project{{end}}{{end}}
{{ if DB == "EF" }}
````json
"ConnectionStrings": {
"Default": "Server=localhost;Database=BookStore;Trusted_Connection=True"
}
````
The solution is configured to use **Entity Framework Core** with **MS SQL Server** by default. EF Core supports [various](https://docs.microsoft.com/en-us/ef/core/providers/) database providers, so you can use any supported DBMS. See [the Entity Framework integration document](Entity-Framework-Core.md) to learn how to [switch to another DBMS](Entity-Framework-Core-Other-DBMS.md).
### Apply the Migrations
The solution uses the [Entity Framework Core Code First Migrations](https://docs.microsoft.com/en-us/ef/core/managing-schemas/migrations/?tabs=dotnet-core-cli). So, you need to apply migrations to create the database. There are two ways of applying the database migrations.
#### Apply Migrations Using the DbMigrator
The solution comes with a `.DbMigrator` console application which applies migrations and also **seeds the initial data**. It is useful on **development** as well as on **production** environment.
> `.DbMigrator` project has its own `appsettings.json`. So, if you have changed the connection string above, you should also change this one.
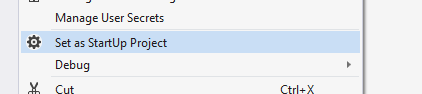
Right click to the `.DbMigrator` project and select **Set as StartUp Project**
Hit F5 (or Ctrl+F5) to run the application. It will have an output like shown below:

> Initial [seed data](Data-Seeding.md) creates the `admin` user in the database (with the password is `1q2w3E*`) which is then used to login to the application. So, you need to use `.DbMigrator` at least once for a new database.
#### Using EF Core Update-Database Command
Ef Core has `Update-Database` command which creates database if necessary and applies pending migrations.
{{ if UI == "MVC" }}
Right click to the {{if Tiered == "Yes"}}`.IdentityServer`{{else}}`.Web`{{end}} project and select **Set as StartUp project**:
{{ else if UI != "MVC" }}
Right click to the `.HttpApi.Host` project and select **Set as StartUp Project**:
{{ end }}

Open the **Package Manager Console**, select `.EntityFrameworkCore.DbMigrations` project as the **Default Project** and run the `Update-Database` command:

This will create a new database based on the configured connection string.
> **Using the `.DbMigrator` tool is the suggested way**, because it also seeds the initial data to be able to properly run the web application.
>
> If you just use the `Update-Database` command, you will have an empty database, so you can not login to the application since there is no initial admin user in the database. You can use the `Update-Database` command in development time when you don't need to seed the database. However, using the `.DbMigrator` application is easier and you can always use it to migrate the schema and seed the database.
{{ else if DB == "Mongo" }}
````json
"ConnectionStrings": {
"Default": "mongodb://localhost:27017/BookStore"
}
````
The solution is configured to use **MongoDB** in your local computer, so you need to have a MongoDB server instance up and running or change the connection string to another MongoDB server.
### Seed Initial Data
The solution comes with a `.DbMigrator` console application which **seeds the initial data**. It is useful on **development** as well as on **production** environment.
> `.DbMigrator` project has its own `appsettings.json`. So, if you have changed the connection string above, you should also change this one.
Right click to the `.DbMigrator` project and select **Set as StartUp Project**

Hit F5 (or Ctrl+F5) to run the application. It will have an output like shown below:

> Initial [seed data](Data-Seeding.md) creates the `admin` user in the database (with the password is `1q2w3E*`) which is then used to login to the application. So, you need to use `.DbMigrator` at least once for a new database.
{{ end }}
## Run the Application
{{ if UI == "MVC" }}
{{ if Tiered == "Yes" }}
1. Ensure that the `.IdentityServer` project is the startup project. Run this application that will open a **login** page in your browser.
> Use Ctrl+F5 in Visual Studio (instead of F5) to run the application without debugging. If you don't have a debug purpose, this will be faster.
You can login, but you cannot enter to the main application here. This is **just the authentication server**.
2. Ensure that the `.HttpApi.Host` project is the startup project and run the application which will open a **Swagger UI** in your browser.

This is the HTTP API that is used by the web application.
3. Lastly, ensure that the `.Web` project is the startup project and run the application which will open a **welcome** page in your browser
Click to the **login** button which will redirect you to the *authentication server* to login to the application:

{{ else # Tiered != "Yes" }}
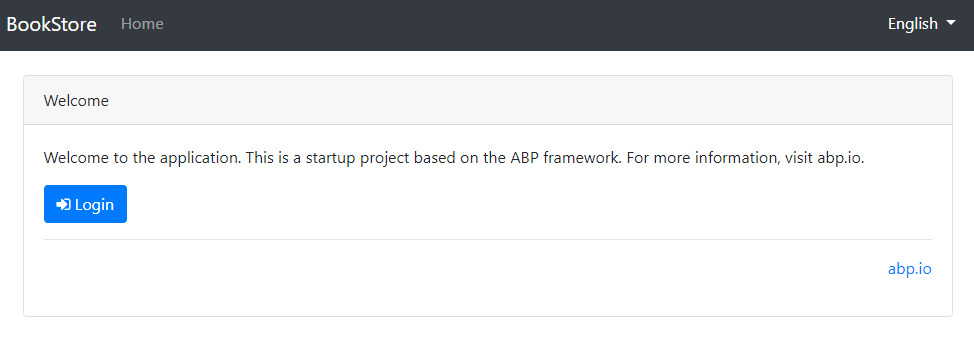
Ensure that the `.Web` project is the startup project. Run the application which will open the **login** page in your browser:
> Use Ctrl+F5 in Visual Studio (instead of F5) to run the application without debugging. If you don't have a debug purpose, this will be faster.

{{ end # Tiered }}
{{ else # UI != "MVC" }}
### Running the HTTP API Host (Server Side)
{{ if Tiered == "Yes" }}
Ensure that the `.IdentityServer` project is the startup project. Run the application which will open a **login** page in your browser.
> Use Ctrl+F5 in Visual Studio (instead of F5) to run the application without debugging. If you don't have a debug purpose, this will be faster.
You can login, but you cannot enter to the main application here. This is just the authentication server.
Ensure that the `.HttpApi.Host` project is the startup project and run the application which will open a Swagger UI:
{{ else # Tiered == "No" }}
Ensure that the `.HttpApi.Host` project is the startup project and run the application which will open a Swagger UI:
> Use Ctrl+F5 in Visual Studio (instead of F5) to run the application without debugging. If you don't have a debug purpose, this will be faster.
{{ end # Tiered }}

You can see the application APIs and test them here. Get [more info](https://swagger.io/tools/swagger-ui/) about the Swagger UI.
> ##### Authorization for the Swagger UI
>
> Most of the HTTP APIs require authentication & authorization. If you want to test authorized APIs, manually go to the `/Account/Login` page, enter `admin` as the username and `1q2w3E*` as the password to login to the application. Then you will be able to execute authorized APIs too.
{{ end # UI }}
{{ if UI == "Blazor" }}
### Running the Blazor Application (Client Side)
Ensure that the `.Blazor` project is the startup project and run the application.
> Use Ctrl+F5 in Visual Studio (instead of F5) to run the application without debugging. If you don't have a debug purpose, this will be faster.
Once the application starts, click to the **Login** link on to header, which redirects you to the authentication server to enter a username and password:

{{ else if UI == "NG" }}
### Running the Angular Application (Client Side)
Go to the `angular` folder, open a command line terminal, type the `yarn` command (we suggest to the [yarn](https://yarnpkg.com/) package manager while `npm install` will also work)
```bash
yarn
```
Once all node modules are loaded, execute `yarn start` (or `npm start`) command:
```bash
yarn start
```
It may take a longer time for the first build. Once it finishes, it opens the Angular UI in your default browser with the [localhost:4200](http://localhost:4200/) address.

{{ end }}
Enter **admin** as the username and **1q2w3E*** as the password to login to the application. The application is up and running. You can start developing your application based on this startup template.
## Mobile Development
If you want to include a [React Native](https://reactnative.dev/) project in your solution, add `-m react-native` (or `--mobile react-native`) argument to project creation command. This is a basic React Native startup template to develop mobile applications integrated to your ABP based backends.
See the [Getting Started with the React Native](Getting-Started-React-Native.md) document to learn how to configure and run the React Native application.
## Next
* [Web Application Development Tutorial](Tutorials/Part-1.md)